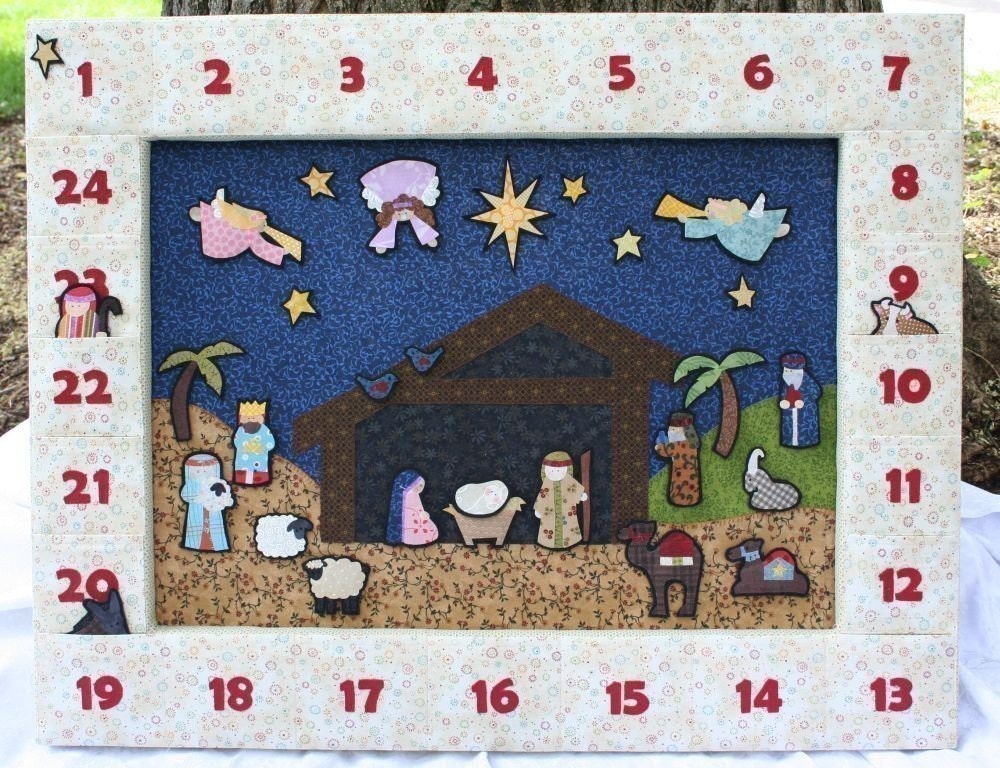
Here is the completed Natvity Advent Calendar!! You will have to wait till Christmas to see all of the characters out of their pockets! Now, where to hang it in my house??
Thursday, December 8, 2011
Monday, December 5, 2011
Project Nativity: Day 6
Gold, Frankincense and Myrrh! When I was a kid, that is what I thought the wisemen's names were. haha.
The Nativity Advent Calendar is ALMOST done!! It's a few days late, but I don't think J will notice. Only two more characters to go! Stay tuned!
Wednesday, November 30, 2011
Project Nativity: Day 5
I was really hoping to get the frame/pockets completed tonight so it would be ready for Advent to start tomorrow.... But, I got only half done. Here is a sneaky peaky:
Yes, Virginia, there is HAND STITCHING! (I've gone off the deep end!)
What you can't see is my massive headache and neck cramps. They are worth it! I am so tickled with how this is turning out...Off to bed!
Still haven't decided what order the characters should go in. Any suggestions?
Tuesday, November 29, 2011
Project Nativity: Day 4
I made some nice progress tonight on the frame! I decided not to rip all the old paper off. Just used good ol' Modpodge to glue brown paper on overtop of the old stuff.
I also started laminating my characters using my Xyron 510 and two-sided laminate. A word to the wise: use a bone folder to scrape over the characters and go around all the edges after running them through the Xyron. This will ensure good adhesion.
The red paper will form the numbered pockets to hold each character until it is their turn to be placed on the Nativity Scene. There will be 24 pockets, 12 on the top, 12 on the bottom.
I also made a SUPER cute Donkey and Camel. One thing that I really admired about my inspiration for this project was the different patterns used for each character. So- I am really pleased with these particular animals!
One more night to get this all ready for Advent to start on Thursday!!! AHHHH!
P.S.- I should mention that I changed the dial size for the Camel. He is 5 inches.
I also started laminating my characters using my Xyron 510 and two-sided laminate. A word to the wise: use a bone folder to scrape over the characters and go around all the edges after running them through the Xyron. This will ensure good adhesion.
The red paper will form the numbered pockets to hold each character until it is their turn to be placed on the Nativity Scene. There will be 24 pockets, 12 on the top, 12 on the bottom.
I also made a SUPER cute Donkey and Camel. One thing that I really admired about my inspiration for this project was the different patterns used for each character. So- I am really pleased with these particular animals!
One more night to get this all ready for Advent to start on Thursday!!! AHHHH!
P.S.- I should mention that I changed the dial size for the Camel. He is 5 inches.
Monday, November 28, 2011
Project Nativity: Day 3
My goodness!! We have to start "doing" the advent calendar on THURSDAY!!! I better get to workin' hard on this thing.
Tonight I made a herd of fluffy sheep!! How cute are they?!
So here is what I have so far:
I SHOULD have made two sheep facing left, and two sheep facing right (GRRRR). Oh Well!!
No, the frame is still not put together. The numbered pockets to hold the characters will go around the outside on the frame. I have a big idea in my head for that, but it will have to wait till tomorrow night! That involves measuring and cutting straight lines, and it is late!!
Check back soon!!
Tonight I made a herd of fluffy sheep!! How cute are they?!
So here is what I have so far:
I SHOULD have made two sheep facing left, and two sheep facing right (GRRRR). Oh Well!!
No, the frame is still not put together. The numbered pockets to hold the characters will go around the outside on the frame. I have a big idea in my head for that, but it will have to wait till tomorrow night! That involves measuring and cutting straight lines, and it is late!!
Check back soon!!
Project Nativity: Day 2
The other night I created the most important centerpiece of the natvity: The manger scene! We have the Stable, Mary, Joseph, a manger and Baby Jesus!!
Ta-da!
Ta-da!
I decided the size for the characters should be 3.5 inches. Usually the Cricut will cut everything to scale of the paper doll body size, but NOT the case for the stable! The stable I had to manually change the dial size to 6.5". 3.5" is the size for all of the other characters thus far (even the manger and Baby Jesus).
I've been thinking a lot about what order I should put the characters in for the "Advent." My idea is to read the Nativity Story each evening with my child, and put one character on the board. But in reality, and in the story, Baby Jesus comes FIRST! Then the shepherds and the wise men, animals, etc. A traditional Advent Calendar would put Baby Jesus on the 25th- last to show up to the advent party!
Tuesday, November 22, 2011
Project Nativity: Day 1
This past weekend I went shopping with my Mom for materials for the Nativity. We found awesome star and "sand" paper. I am using a "magnet board" that I was previously using to display my scrapbook pages:
The board measures 14x29 inches on the inside of the frame.
Today I made the background of the nativity scene, and started the destruction of the decor on the frame. I am going to need a lot of Goo Gone.... and I broke a nail. I am way to frustrated today to get started on cutting the characters!
I need to take a few moments to calm my spirit by actually reading the Christmas Story from the Bible for even more inspiration.
Project Nativity
I've been away from my blog for so long. Since J was born, it's been challenging to be crafty. But, I've been inspired to make a Nativity Advent Calendar for my family. I can't think of a better way to teach J about the precious, miraculous story of Christmas!
I was inspired by a project that I saw on Etsy by Jenn Matthews. It is made out of fabric:
Adorable, right?!
Well, that got my wheels turning and I thought, "I can make that out of paper!" I will be using the "Paper Doll Dress Up" Cricut Cartridge by Provo Craft to make the characters.
So, I will post each time I make progress on the project with pictures, and my true feelings during each stage. If you are inspired, please feel free to comment!!
I was inspired by a project that I saw on Etsy by Jenn Matthews. It is made out of fabric:
Adorable, right?!
Well, that got my wheels turning and I thought, "I can make that out of paper!" I will be using the "Paper Doll Dress Up" Cricut Cartridge by Provo Craft to make the characters.
So, I will post each time I make progress on the project with pictures, and my true feelings during each stage. If you are inspired, please feel free to comment!!
Thursday, May 12, 2011
You n' Me Baby, we're stuck like glue!
Happy Anniversary, Bryan! 4 years and counting, I love you! Thanks so much for the concert surprise!
Monday, May 9, 2011
Yard Sale!!!!

The Cozy Crop House's 3rd annual Scrap & Stamp yard sale is this weekend...May 13-14, 7 a.m. to 5 p.m. each day. TONS of scrapbooking, cardmaking, and stamping tools, totes, paper, embellishments, etc., all marked at super low prices! These 40+ sellers are serious about moving their goods! Plus we'll have food vendors to support House of His Creation ministry. Come out for a fun day! 31 W. Millport Road, Lititz, PA.
Make sure you buy lots of goodies from seller #75! That's me!!
Saturday, February 5, 2011
I scrapped!
Hello! I finally scrapped! After a nine month long hiatus... This is the first page of J's baby album. Based on a sketch by Scrapbaby!, my dear friend, Jessica Carlberg :)
Subscribe to:
Posts (Atom)